So....why do these postings never stay formatted the way I create them?
Oh well.....
Sunday, August 17, 2008
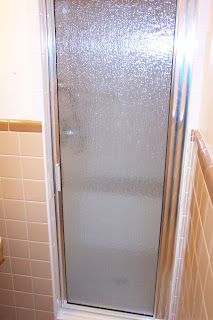
Ta-DAH!

Ok--I think it's about as finished as it's going to get....Granny has already used her new shower 3 times--seems to work ok. The workers say they need to finsh off the end of the bottom door strip (cut or file the end I think) and then they want to go over the tiles with some water spot remover---I'm guessing it's a chemical to remove any left over grout or sealer spots. But, I've already been cleaning and putting things back into the bathroom....so now it's just a matter of Granny getting her things re-organized and put away and we are DONE!
Day 6 (+7 days): We had to wait a whole week (I just love construction projects, don't you?) for the colored accent tiles to arrive and the rest of the ivory tiles to be set because they didn't have enough of the ivory tiles with them. Picture to the left is what it looked like for a whole week....

This is neat--they put the accent tile around the door frame on the inside--you can only see it from inside the shower. (And don't think it wasn't hard to get a picture of it without stepping on the floor tile!)


Day 6 (+7 days): We had to wait a whole week (I just love construction projects, don't you?) for the colored accent tiles to arrive and the rest of the ivory tiles to be set because they didn't have enough of the ivory tiles with them. Picture to the left is what it looked like for a whole week....
Then, we got the tile in, the grab bars installed, and a new faucet for the sink which will match the shower fixtures.

This is neat--they put the accent tile around the door frame on the inside--you can only see it from inside the shower. (And don't think it wasn't hard to get a picture of it without stepping on the floor tile!)

Day 8: Grout sealed and walls/ceiling painted--wait for drying, clean and then USE! We decided to replace the existing shower head with one which has a little extra handle strip for ease of holding onto, and then added a mounting fixture on the grab bar.

Well.........what do you think?
Friday, August 1, 2008
Bathroom Renovations!
We decided to convert Granny's bathroom closet into a shower to make it more convenient & safer for Granny to take a shower. Following is a pictorial of the progression.


This is Granny standing in the closet which was jammed packed with stuff--see all the shelves we took out? The next picture is some of the closet items piled up in the sewing room. THEN, I also had to clean out the area over the bathrooms in the attic because we were having a vent/light installed in the ceiling--that's also piled up in the sewing room (but not pictured here)!
Day 1: removal of the dry wall, door frame, and plumbing work leading to the new shower.
Day 2: installing concrete wall board, making bench seat, finishing the drain, pouring concrete floor.

This is the new vent/light in the renovated bathroom for Granny.
Day 3: Rest--waiting for the concrete floor to dry.
Day 4 & 5: Installing the tile.
Very nice corner soap dish, huh? And it's REALLY big, so can also hold shampoo bottles as well as bar soap.
Weekend BREAK!!!! We will let the tile sit over the weekend...then Monday is scheduled for grouting.
We also had the heat/fan replaced in the main bathroom with a heat/vent/light--here are the before and after pictures. You can see where the old round one was....and later on the entire ceiling was re-painted so you can't see any evidence.

Subscribe to:
Comments (Atom)


